Learn how to select trading cards to submit for grading with an in-hand checklist for centering, corners, edges, and surface. Avoid surprises. Read now.
How to Select Cards to Submit for Grading (Checklist)
Choosing the right cards to submit is the real grading skill. As of 2025-12-31, fees and markets change fast, but one thing stays true: most grading regrets happen because we submit the wrong cards.
This guide is not about grading from photos. It is a repeatable, in-hand process to inspect cards, estimate realistic grade ranges, and decide what is actually worth sending to a grading company like PSA or Beckett.

TL;DR
- Start with value first: if the card is not worth submitting in a realistic “not a top grade” outcome, stop early.
- Sort first, then inspect: put cards into “no”, “maybe”, and “yes” piles before you spend time on tiny details.
- Use strong light: most surface problems only show up when you tilt the card under a bright lamp.
- Always check the back: edge whitening and small dings often show better on the back.
- Decide with a grade range: submit when the downside grade still makes sense after fees, shipping, and time.
- Use figoca for comps: sold-price context helps you submit fewer cards and choose better ones.
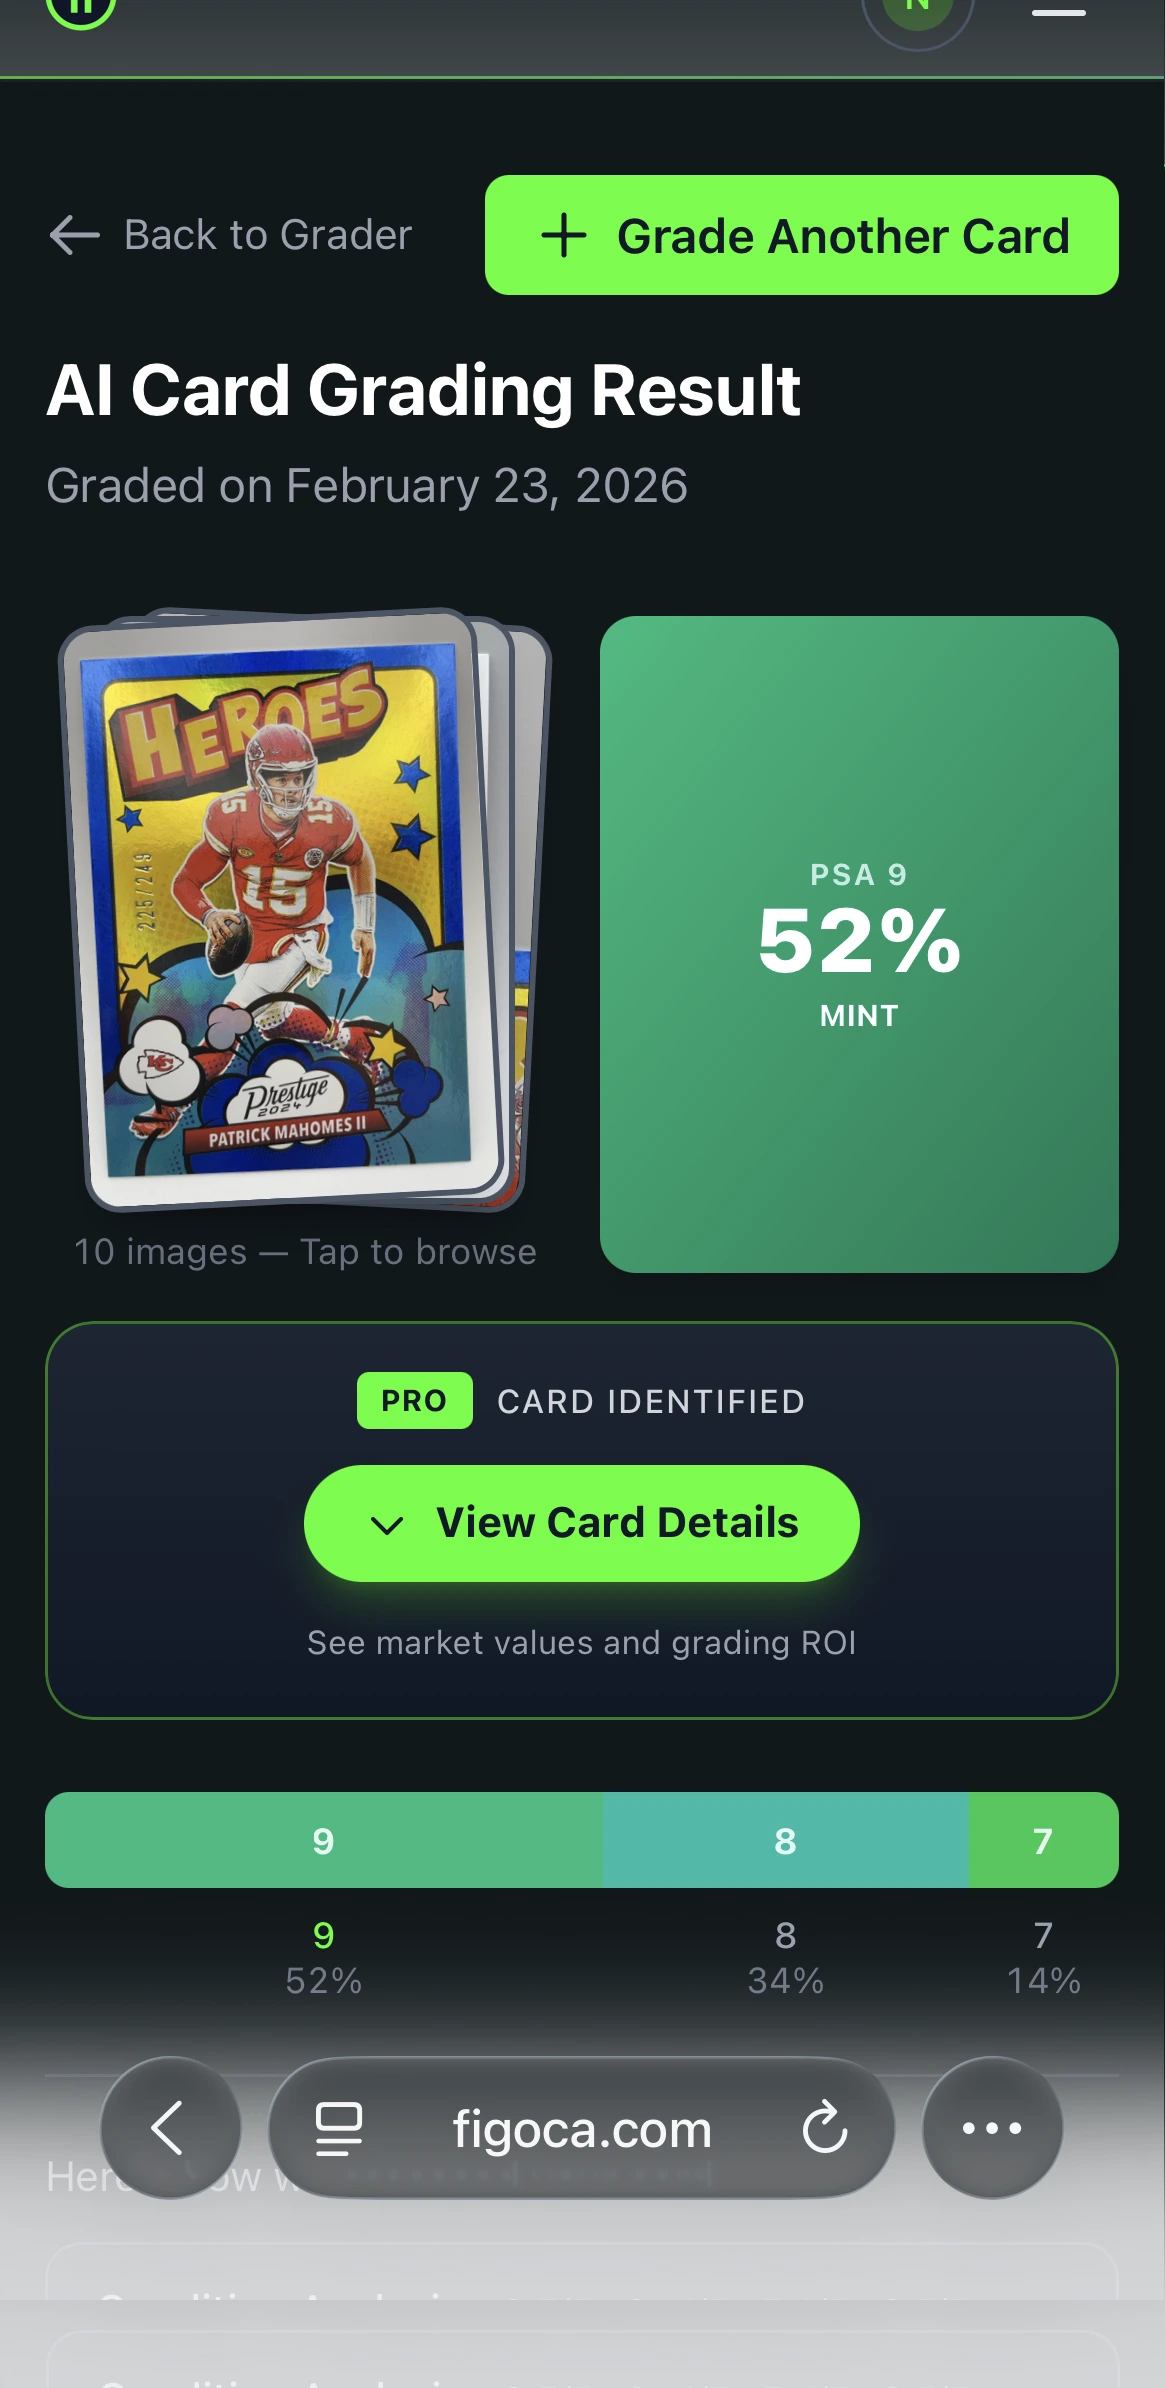
- Try the AI card grading tool: get a quick condition estimate from photos before you decide to submit.
AI Card Grader
Know your card's grade before you submit
Snap a photo with your phone and get an instant AI-powered grade estimate. Check centering, corners, edges, and surface — just like the pros.
- Instant grade estimate
- Sub-grades for all 4 pillars
- Built-in ROI calculator
- Free to use
figoca extension
Get card comps on eBay in seconds
See comps directly on eBay listings and search results. Save time, avoid overpaying, and learn faster while you browse.
- Comps inline on item and search pages
- Automatic card detection and parsing
- Fast, privacy-first, and free
- Built for newcomers and hobbyists
How do you choose cards to submit for grading?
Choose cards to submit for grading by filtering for value first, then inspecting each card in hand under strong light. Check centering, corners, edges, and surface, and decide on a realistic grade range. Only submit when the likely outcome still makes sense after fees, shipping, and the time your card is away.
Step 0: pick your submission goal
Start by being honest about why you are submitting:
- Submitting to sell soon: prioritize cards with strong demand and clean condition. Your goal is buyer trust and easy comps.
- Submitting to keep: you can grade personal favorites even if they are not perfect.
- Trying to learn: submit a small batch so you can compare your expectations to the grades you get back.
If you want a value-first framework before you ship anything, use: Should you grade that card? A simple EV method.
The setup that makes in-hand checks easier
You do not need fancy tools. You need a clean setup that makes flaws visible without adding new damage.
| Tool | What it helps with | Why it matters for grading submissions |
|---|---|---|
| Gloves (cotton or nitrile) | Handling without fingerprints | Fingerprints and light rubbing can add marks on glossy cards |
| Loupe (10x) | Seeing small flaws | Tiny corner issues and fine surface lines add up fast |
| Soft mat or towel | Safe work surface | Reduces the chance of accidental corner dings |
| Centering stencil | Measuring borders fast | Centering is common, and the eye gets tired |
| Bright desk lamp | Reveals surface issues | Tilted light shows scratches, print lines, and small dents |
| Penny sleeves + semi-rigids | Shortlist storage | Keeps your “yes” pile protected and ready to pack |


Step-by-step: the selection workflow before you submit
Step 1: do a 60-second “no / maybe / yes” sort
Before you inspect details, make three piles:
- No: crease, hard bend, major corner bend, heavy whitening, big dent, water damage, writing, or obvious miscut.
- Maybe: looks clean at a glance, but you need a closer look.
- Yes: looks clean and has a real reason to submit (value, rarity, personal importance).
This sort alone prevents most expensive “why did I submit this” submissions.
Step 2: confirm the exact card
It sounds obvious, but it saves mistakes:
- Match the year, set, and card number
- Confirm the correct parallel or variant
- Check the right language and finish if the set has multiple versions
Step 3: handle the card safely
- Remove it carefully if it is in a top loader, one-touch, or binder
- Hold by the edges and avoid touching the front surface
- Inspect on a soft surface so you do not create new damage
Step 4: check centering first (fastest pass or fail)
Centering is the fastest place to save time.
- Front centering: compare left vs right borders, then top vs bottom
- Back centering: repeat the same check
- Edge-to-edge designs: use a stencil or ruler so you do not guess
If you are still learning grading basics, read: PSA grades explained.


Step 5: check corners (where most top grades die)
Corners are fragile and easy to overrate.
- Check all four corners on the front, then the back
- Look for whitening, soft points, small bends, and tiny dings
- Use the loupe if you are unsure
Step 6: check edges (especially on dark borders)
Edges often look fine until you tilt the card and move it in the light.
- Scan all four edges on the front for chipping, rough cuts, and small dents
- Scan all four edges on the back for whitening and factory dings
Dark borders punish tiny white chips. Do not “hope” those chips will not matter.
Step 7: check the surface with strong, tilted light
Most surface issues only show up when you change angles.
Use a bright desk lamp and tilt the card slowly. Look for:
- Scratches: long lines that appear at certain angles
- Print lines: straight factory lines, common on modern glossy cards
- Dents and pressure marks: small “pops” in the stock that only show from one angle
- Indentations: lines or shapes pressed into the card from packaging or storage
- Stains or residue: common on vintage and matte finishes
If you see a surface issue but you are not sure how bad it is, assume the grade ceiling is lower than you hope.
Step 8: add the “card type” checks
Some cards need extra care:
- Autographs: look for fading, skipping, and smudges
- Thick cards and patches: corners and edges chip easily, so expect a lower ceiling
- Vintage: watch for gloss loss, wax stains, and print dots that look like tiny specks
Step 9: calibrate your eye with real graded examples
The fastest way to improve is to compare your cards to real examples:
- Find the same card in likely grades (for example, a mid grade, a high grade, and a top grade)
- Compare what “clean corners” and “clean surface” look like across grades
In-hand checklist: 12 things to check before you submit a card
- Exact match: correct year, set, and variant
- Safe handling: hold by edges, inspect on a soft surface
- Front centering: left/right and top/bottom
- Back centering: repeat the centering check
- Top-left corner: whitening, dings, bends
- Top-right corner: whitening, dings, bends
- Bottom-left corner: whitening, dings, bends
- Bottom-right corner: whitening, dings, bends
- Edges: scan all four edges on both sides for whitening, chips, or dents
- Surface under strong light: tilt the card and look for scratches and print lines
- Dents and pressure marks: tilt slowly and look for small “pops” in the stock
- Card type extras: autos and thick cards need extra attention
Simple if-then rules that prevent expensive mistakes
- If you see a crease or hard bend, then do not submit unless you are grading for personal reasons.
- If centering looks obviously off, then assume a lower grade ceiling and only submit if the value still works.
- If corners show whitening on the back, then expect a grade cap even if the front looks clean.
- If you cannot confirm the surface under strong light, then assume downside risk and submit fewer cards.
- If the card is thick, then lower your top-grade expectations because corners and edges are more fragile.
The final decision: value, grade odds, and fees
Even a carefully inspected card can come back lower than you expected. That is why you should decide with a range, not a dream grade.
- Best case: your high grade outcome
- Realistic case: your most likely grade outcome
- Downside case: the grade you get when hidden issues show up
If the downside case is still fine after grading costs, shipping, and time, you have a good candidate.
For a full decision method (with simple math), start here: Should you grade that card? A simple EV method.
AI Card Grader
Know your card's grade before you submit
Snap a photo with your phone and get an instant AI-powered grade estimate. Check centering, corners, edges, and surface — just like the pros.
- Instant grade estimate
- Sub-grades for all 4 pillars
- Built-in ROI calculator
- Free to use
How figoca fits into the workflow
Use in-hand inspection to avoid bad condition, and use comps to avoid bad prices.
When you check prices and demand:
- Use the figoca extension to see recent sold pricing context faster.
- Shortlist cards that have both value and a realistic grade range.
- Then apply the in-hand checklist above before you submit.
Ready to send them off? Follow our step-by-step PSA submission guide.
If you want the full buying flow for raw cards, see: How to buy sports cards on eBay (ultimate guide).
Common mistakes (and how to avoid them)
- Submitting too many “maybes”: grading is a strategy, not a lottery ticket.
- Ignoring the back: many cards look clean on the front and show whitening on the back.
- Using weak light: surface flaws often disappear until you tilt the card under a strong lamp.
- Over-cleaning: aggressive wiping can add scratches or haze. If you are not experienced, do less.
- Chasing a top grade on borderline cards: submit fewer and focus on your best copies.
FAQ
Can I reliably pick top-grade candidates before I submit?
You can improve your odds, but you cannot guarantee it. Centering, corners, and edges are usually clear in hand. Surface dents and tiny scratches are the hardest part, so use strong light and tilt the card slowly from multiple angles.
What is the most common reason a clean-looking card misses a top grade?
Surface issues. Scratches, print lines, and tiny dents often do not show until you use strong light and change angles.
What is the fastest way to inspect the surface before I submit?
Use a bright desk lamp and tilt the card slowly so the light skims across the surface. Look for long scratches, straight print lines, and small dents that only show from one angle.
How do I check centering before I submit?
Compare left vs right borders and top vs bottom borders on the front, then repeat on the back. If you are unsure, use a centering stencil so you do not guess.
Do I need gloves to select cards to submit?
Not always, but they can help on glossy cards because fingerprints and light rubbing can create small marks. If you do not use gloves, wash and dry your hands and hold the card by the edges.
Do I need a loupe to select cards to submit?
It helps a lot, especially for corners, edges, and fine surface lines. A 10x loupe is enough for most people.
Are thick patch cards harder to get high grades on?
Yes. Thick cards chip and ding more easily, and edges often show wear fast. Inspect corners and edges carefully and expect a lower ceiling.
Is it worth grading a card that is slightly off-center?
Sometimes. The question is value: if your likely grade outcome still sells well after costs, it can be worth it. If you are only profitable in a perfect outcome, it is a risky submission.
Should I clean a card before grading?
Be very careful. Incorrect cleaning can add scratches or haze. If you are not experienced, it is safer to avoid aggressive cleaning and focus on selecting cleaner copies instead.
Should I grade raw cards that are already in a top loader?
A top loader does not prove condition. It only protects the card. You still need to inspect centering, corners, edges, and surface in hand.
What if the card is “pack fresh”?
“Pack fresh” does not mean “grade-ready.” Modern cards can have factory print lines, scratches, and off-centering right out of the pack.
Should I remove a card from a one-touch before grading?
Yes, if you plan to submit it. One-touches can hide edge wear, and removing the card at the last second increases accident risk. Remove it early, inspect it, then store it safely.
What should I do with borderline cards?
Put them in a separate “later” pile. If you still want to grade them, wait until you have more experience and you know how your eye matches real results.
How do I avoid buying a fake graded card while shopping?
Learn quick slab checks and verify certification details. Start here: Fake PSA slabs: the 60-second check.
Which grading company should I submit to?
It depends on your goals and the card type. This guide helps you choose: PSA vs CGC vs BGS vs SGC (2025).
What is a safe way to start grading as a beginner?
Start small: submit a few cards where the downside grade is still fine. Use checklists, compare to graded examples, and keep notes on what came back vs what you expected.
Sources and further reading
- PSA
- CGC Cards
- Beckett Grading (BGS)
- SGC
- PSA grades explained
- Should you grade that card? A simple EV method
Last updated: 2025-12-31

Card enthusiast, figoca founder, and independent software developer
Nico is a card enthusiast who built figoca after running into the same problems many collectors face: uncertain pre-grading decisions, too much tab switching for comps, and no fast way to price cards on the go. He is also a big Kansas City Chiefs fan (❤️💛), follows the Kansas City Royals (💙), and enjoys Formula 1 and Golf.
- Sports Card enthusiast
- Founder of figoca
- Independent software developer with a TypeScript and AWS background